Yocto Interactive Tutorial: Learn Embedded Linux in the Browser
The Problem
The Yocto Project is the industry standard for building custom embedded Linux distributions, but it has one of the steepest learning curves I have encountered in embedded development. The documentation is comprehensive — too comprehensive. On one end you have superficial blog posts that gloss over the hard parts, and on the other end you have the 400-page Yocto Mega Manual. There is almost nothing in between that lets you learn by doing, at your own pace, without provisioning a 100 GB Ubuntu VM and waiting four hours for your first build to finish.
I wanted to fix that.
The Approach
The Yocto Interactive Tutorial is a fully client-side web app that simulates a VS Code-like IDE in the browser. Instead of reading about BitBake recipes or pasting code snippets from a blog, you navigate 20 progressive steps that walk through a real Yocto workflow — from installing host dependencies on Ubuntu, cloning Poky and BSP layers, and configuring local.conf, all the way to writing a custom IIO kernel driver in C, creating BitBake recipes, and assembling a bootable image for the NXP i.MX8M Mini EVK.
The layout is a three-panel IDE modeled after VS Code:
- Left sidebar — an evolving file tree that mirrors the project structure at each stage, from an empty skeleton to a full embedded Linux project with kernel modules, device tree overlays, and image recipes.
- Center panel — a code viewer with syntax-highlighted tabs on top, and an xterm.js-powered simulated terminal below.
- Right panel — the current step’s objective, “why this matters” context, pro tips, and inline glossary definitions for Yocto jargon.
The critical piece is the simulated terminal. At each step where you would run a command, the terminal plays back a pre-recorded session: commands are typed character-by-character with realistic timing, and output appears with natural delays. You get the experience of running commands without the 100 GB disk space or the four-hour build times. Playback controls let you play, pause, resume at configurable speeds (0.5x to 5x), or stop entirely. Auto-play kicks in when you navigate to a step with terminal content.
Progress persists in localStorage — completed steps show checkmarks, your last position is remembered across sessions, and a resume banner appears if you jump around.
Key Technical Details
Terminal playback. The useTerminal hook runs a state machine with four states — idle, playing, paused, done. Commands are rendered character-by-character via xterm.js’s write() API with a 20 ms inter-character delay scaled by the speed multiplier. The hook uses refs and an abort flag to handle React StrictMode’s double-mounting behavior without leaking timeouts. Every playback function is wrapped in useCallback with stable refs to prevent the parent component’s closures from going stale during StrictMode’s commit-phase batching.
Data-driven content architecture. All tutorial content lives in plain TypeScript objects under data/ — steps.ts, code-files.ts, terminal-output.ts, file-trees.ts, diagrams.ts, and glossary.ts. The React components are fully generic; they render whatever data they receive. Adding a new step means editing a TypeScript object, not touching a component. The glossary of 25+ terms supports inline hover tooltips that highlight Yocto-specific jargon directly in the objective panel.
Custom syntax highlighter. Rather than pulling in a heavy library like Prism or Shiki, I wrote a ~110-line regex-based highlighter that supports C, BitBake, Makefile, Device Tree (DTS), and INI file formats. It uses a string-protection pattern to prevent regexes from matching inside HTML attributes after the first pass, with a color palette that mirrors VS Code’s semantic token colors.
VS Code dark theme. The theme is built around a five-level surface hierarchy (--color-surface-0 through --color-surface-5), with dedicated CSS custom properties for syntax tokens, borders, and interactive states. Every animation respects prefers-reduced-motion at the global level.
Static deployment. The entire app compiles to static HTML, CSS, and JS via Next.js’s output: "export" mode. A GitHub Actions workflow with configure-pages and upload-pages-artifact handles deployment to GitHub Pages on every push to main. Zero backend, zero environment variables, zero build-time secrets.
Architecture Diagrams
The repo contains two sets of diagrams: the Yocto pipeline diagrams used inside the tutorial app, and the tutorial app’s own software architecture.
Yocto Pipeline Diagrams (from the app)
These six SVGs are the rendered PlantUML diagrams that appear at specific steps in the tutorial, teaching Yocto concepts visually.
| Diagram | Appears At |
|---|---|
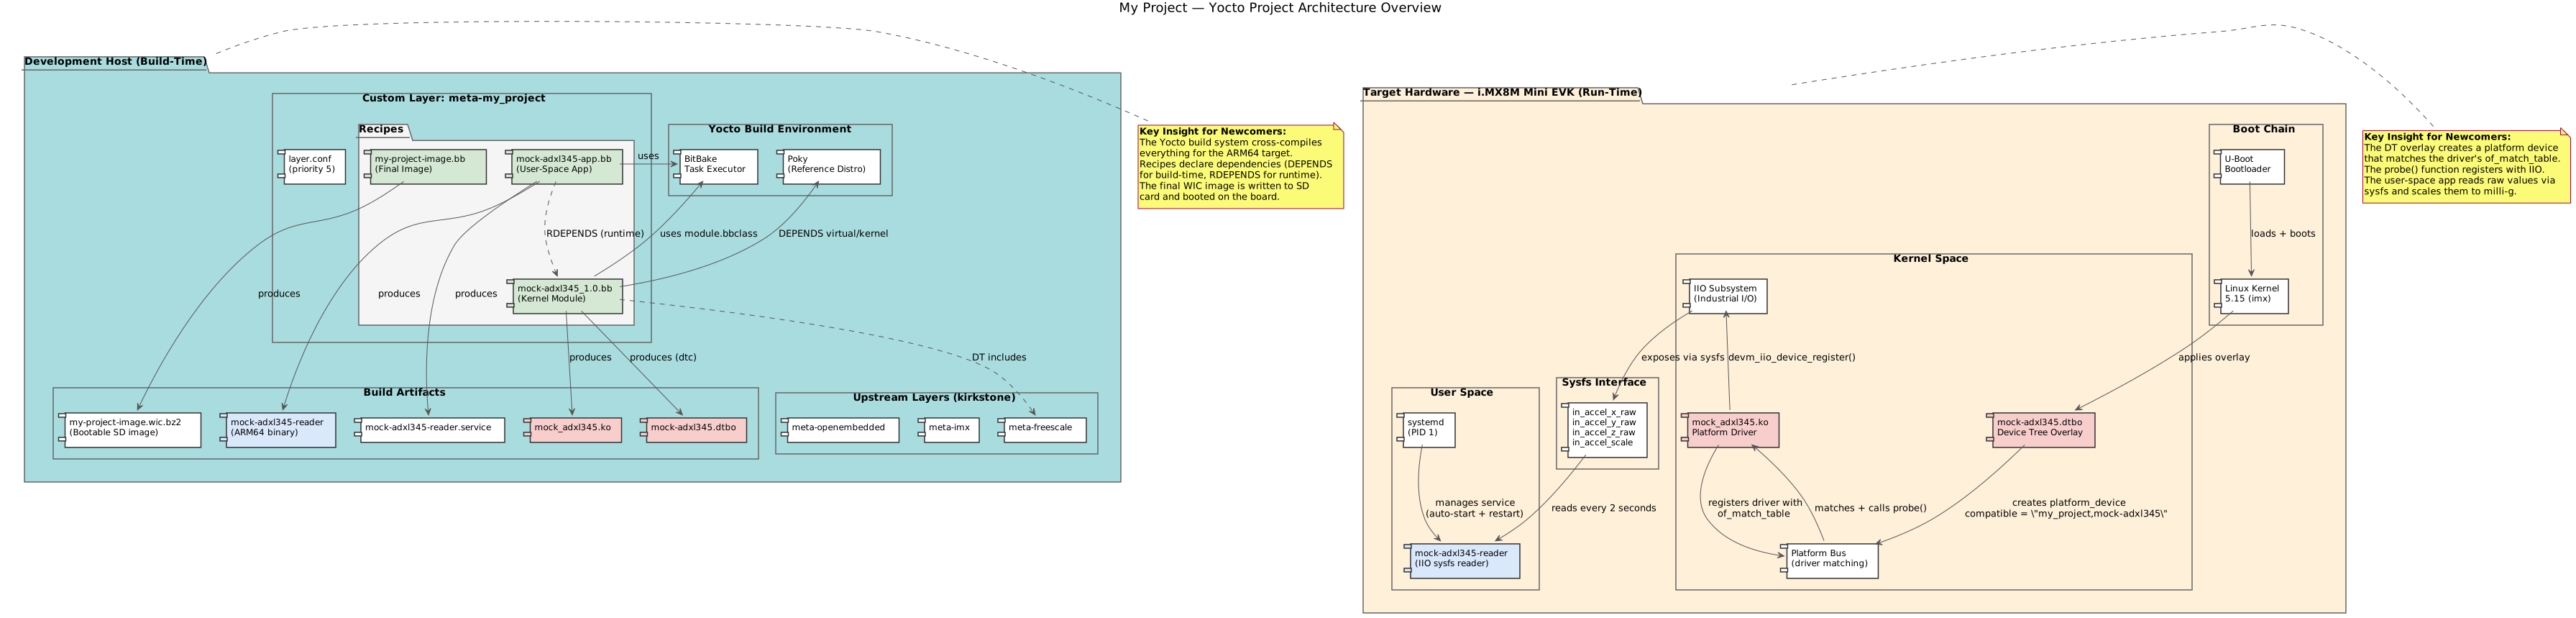 Yocto project structure: sources, custom layer, build output Yocto project structure: sources, custom layer, build output | Step 0 (Welcome) |
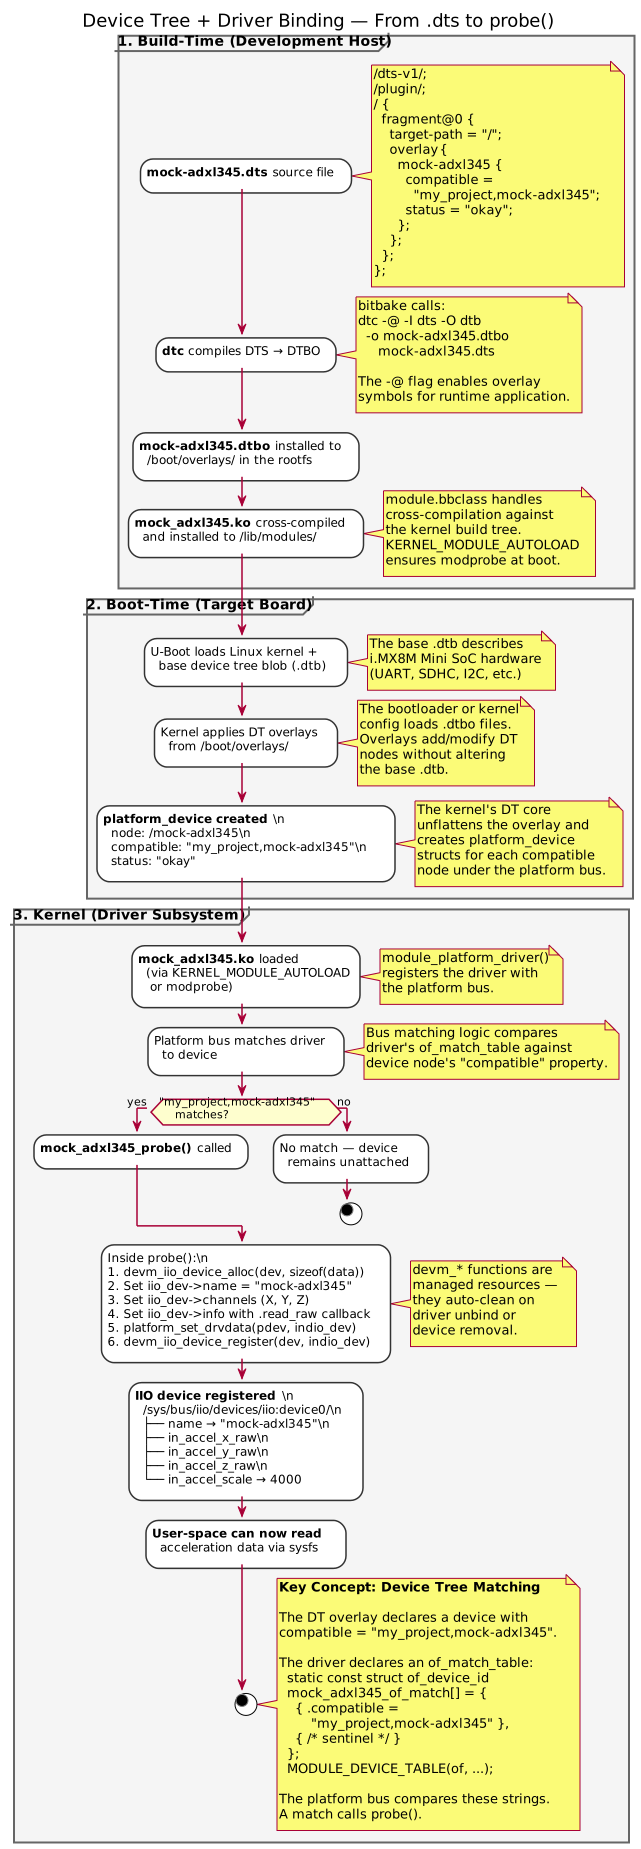 Compatible string matching: driver to device via DT overlay Compatible string matching: driver to device via DT overlay | Step 11 |
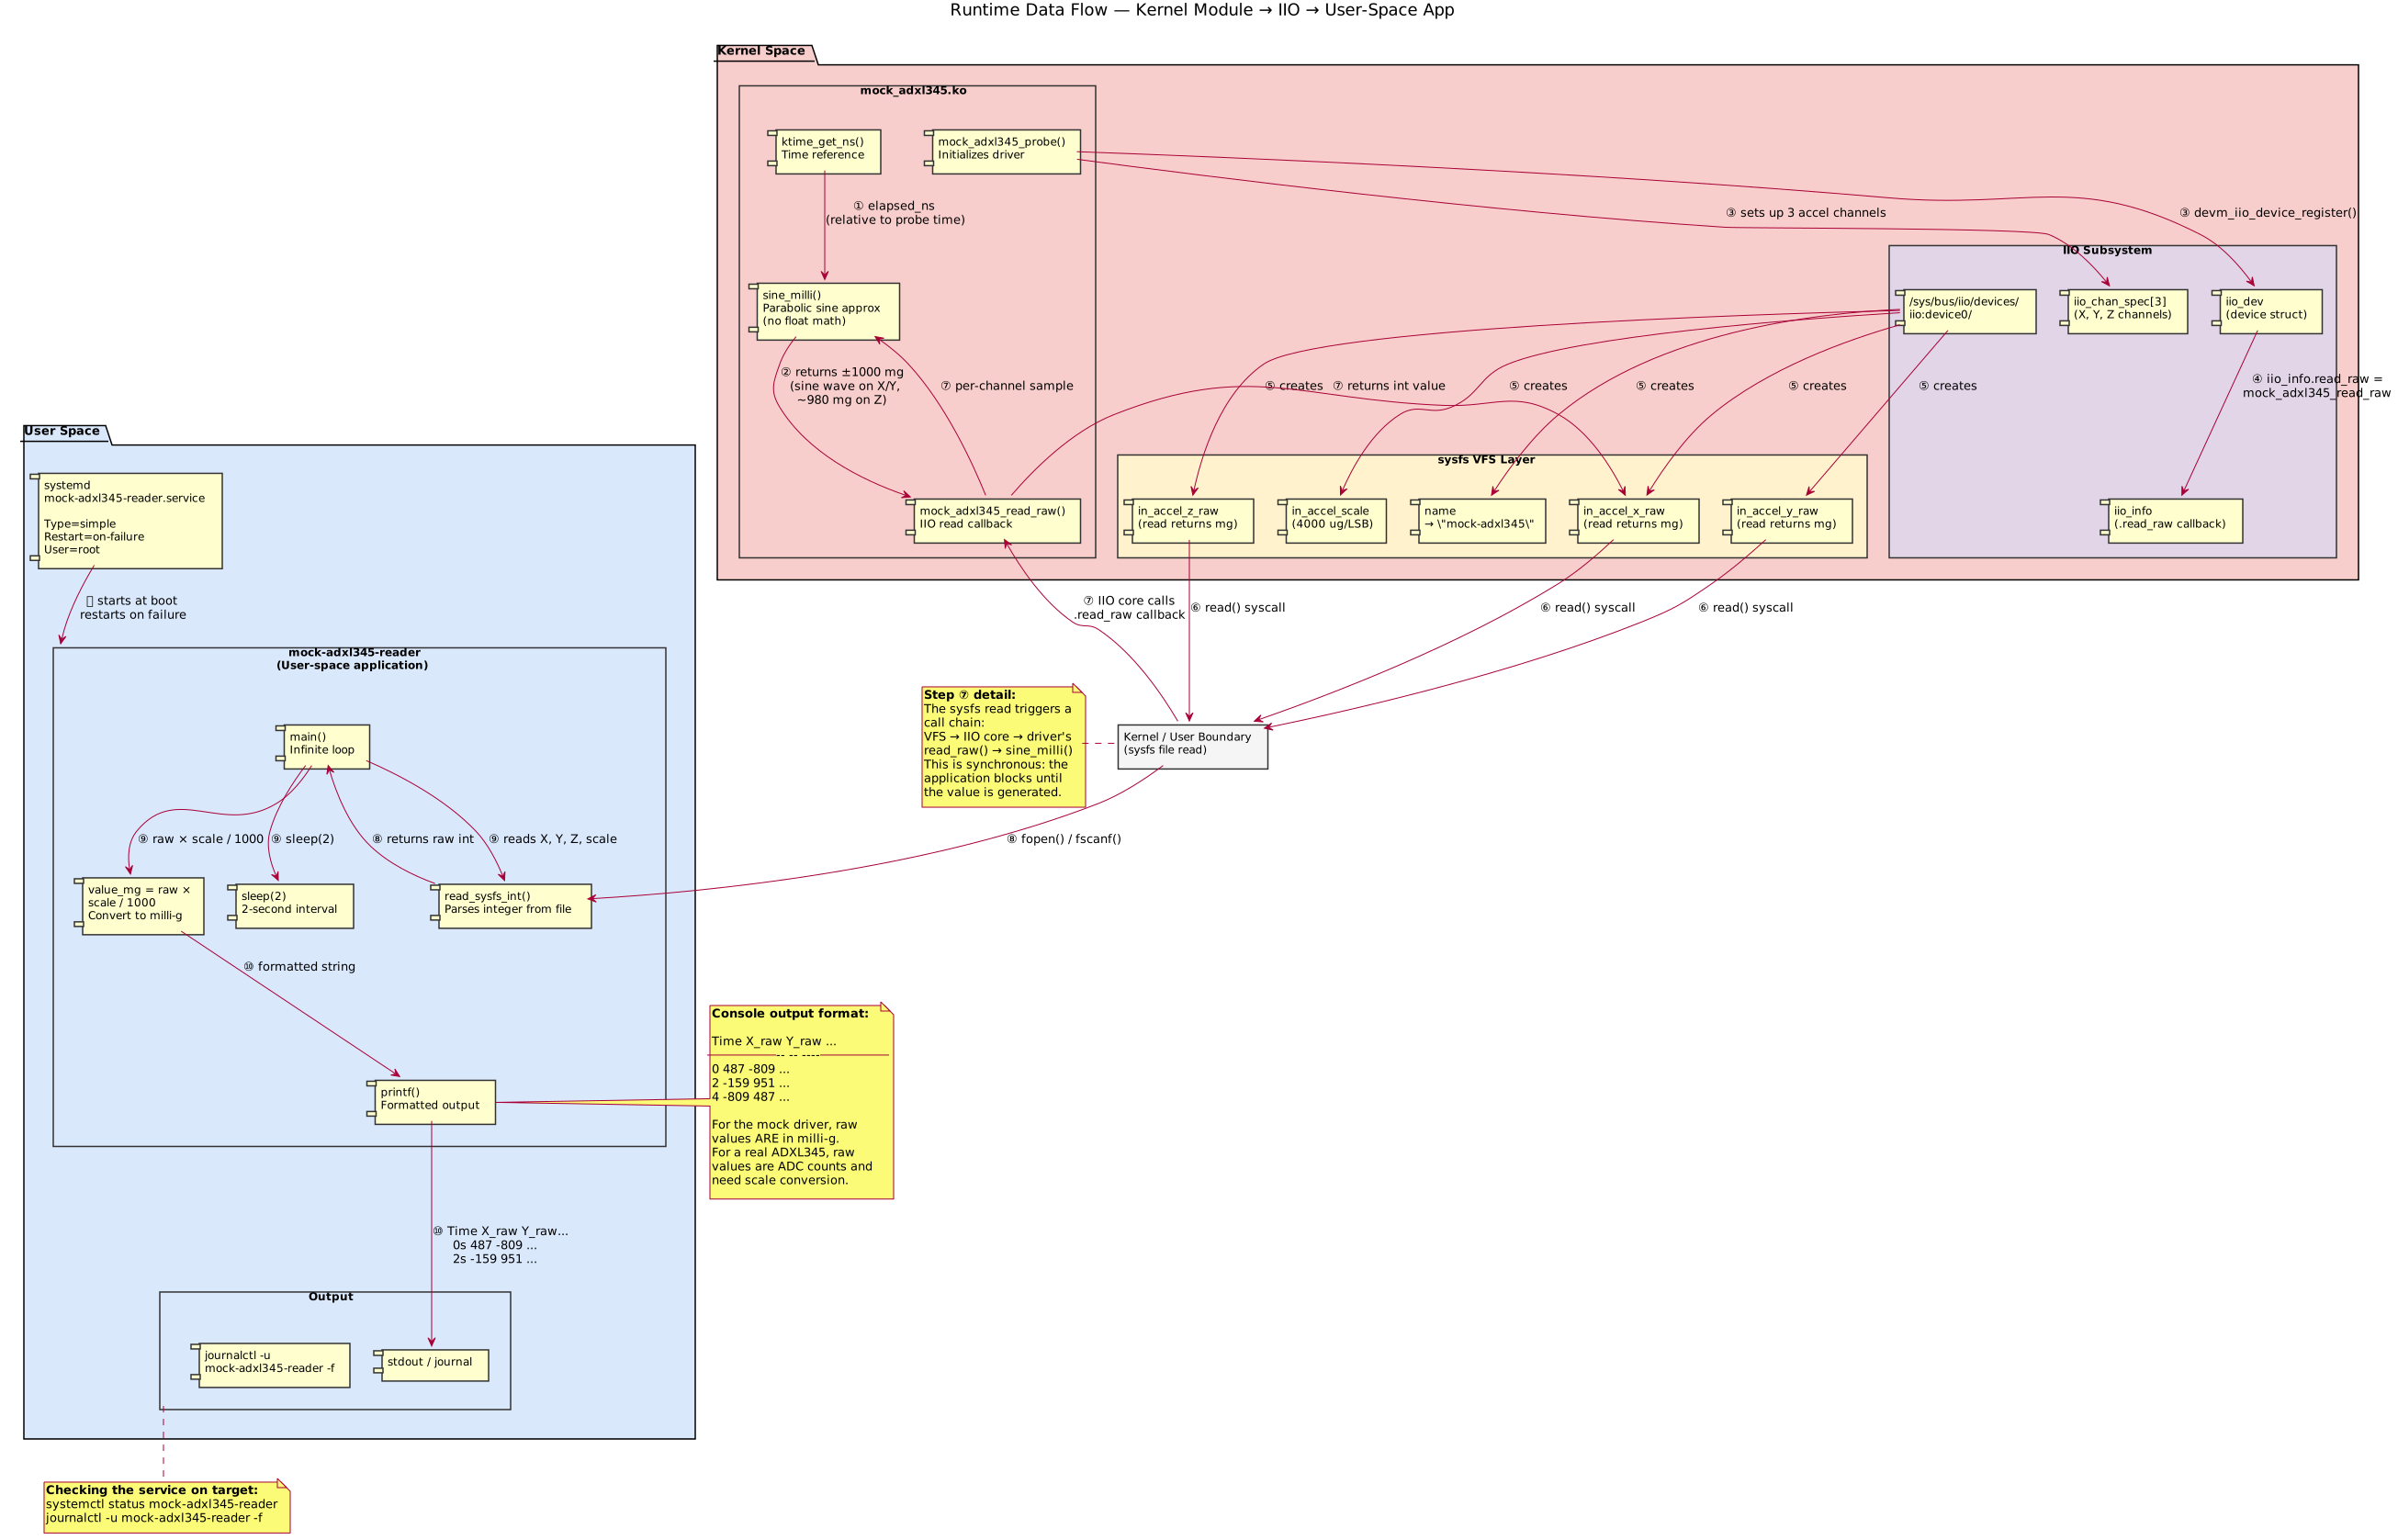 Sensor data path: kernel → IIO → sysfs → user app Sensor data path: kernel → IIO → sysfs → user app | Step 13 |
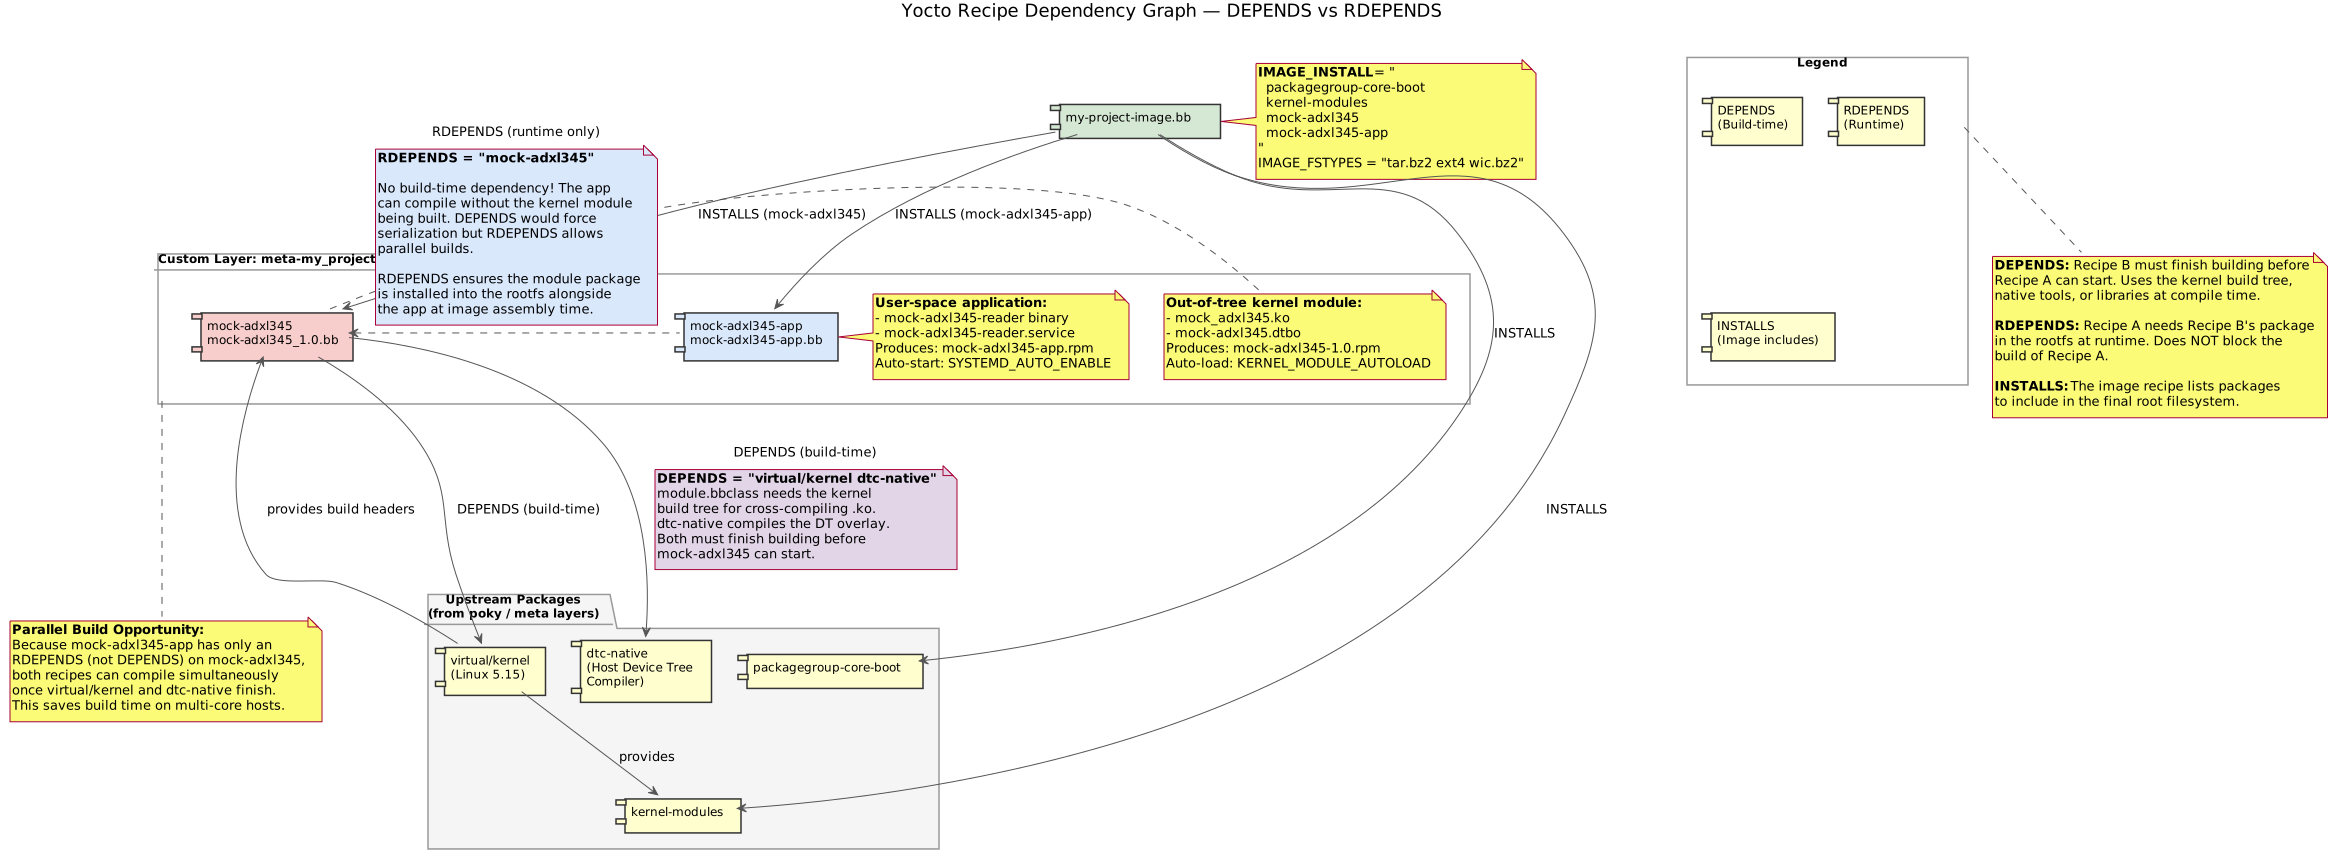 Custom recipe dependencies and upstream layers Custom recipe dependencies and upstream layers | Step 15 |
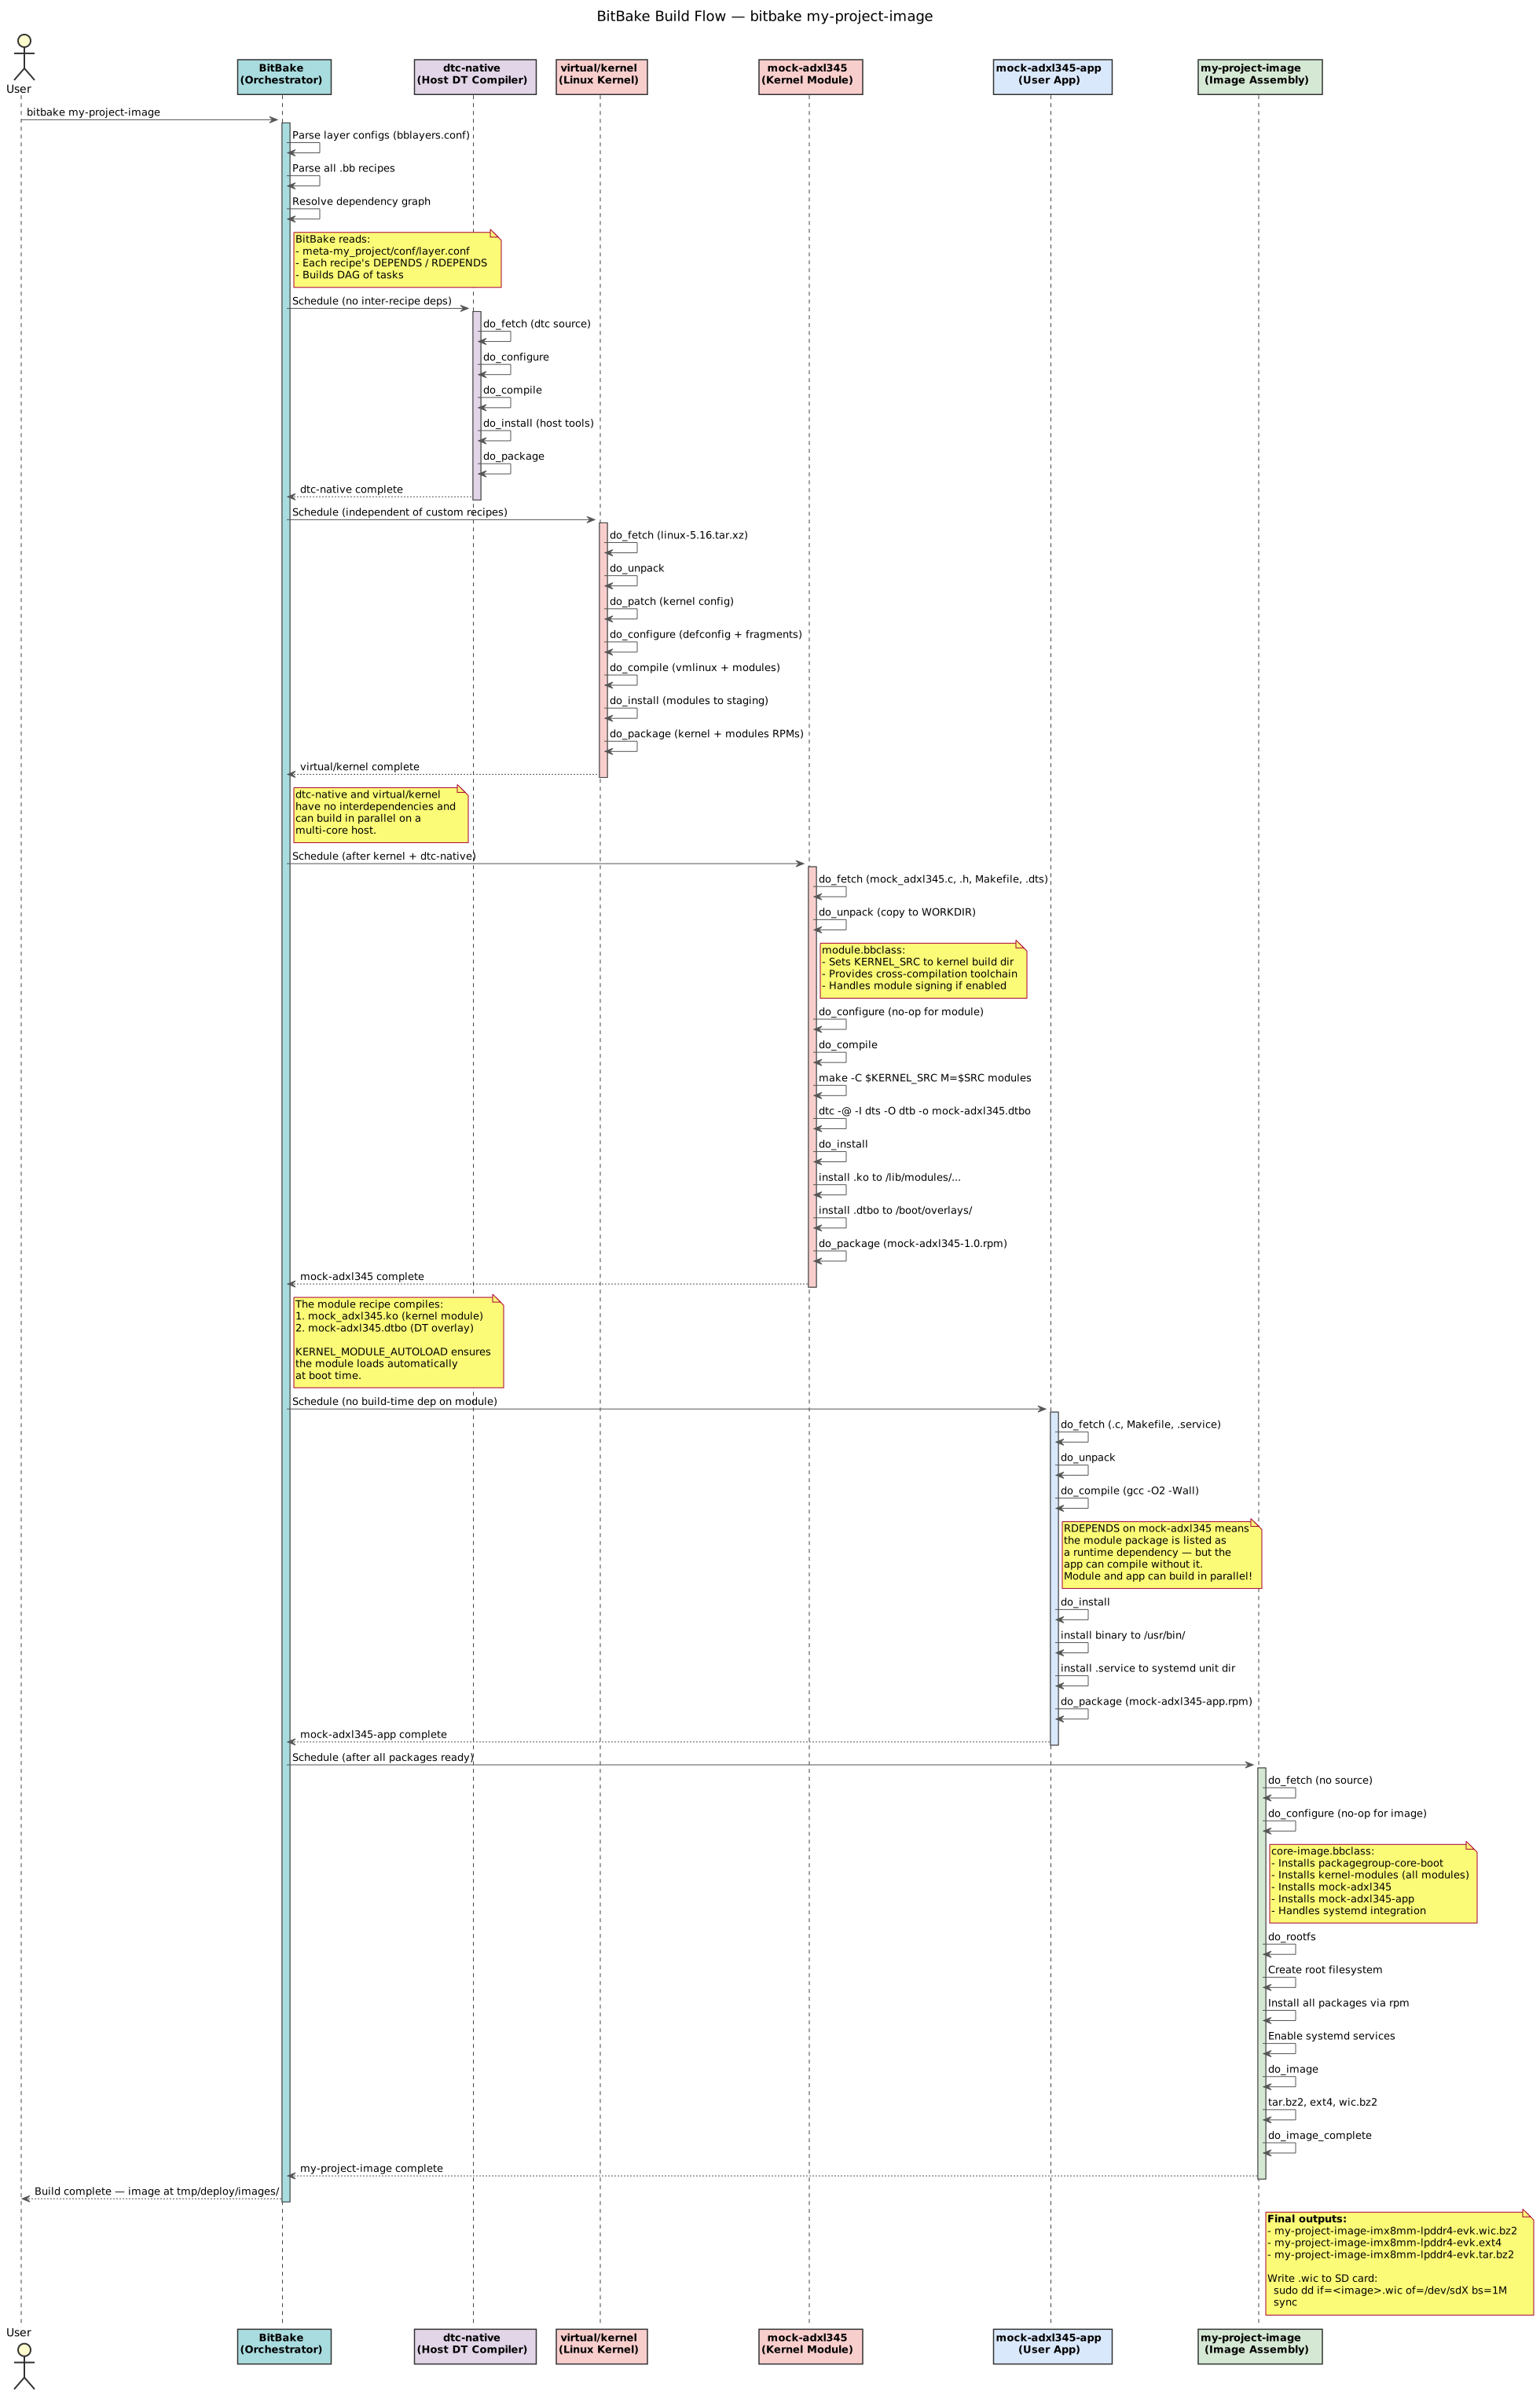 Full BitBake task pipeline: fetch → configure → compile → package Full BitBake task pipeline: fetch → configure → compile → package | Step 16 |
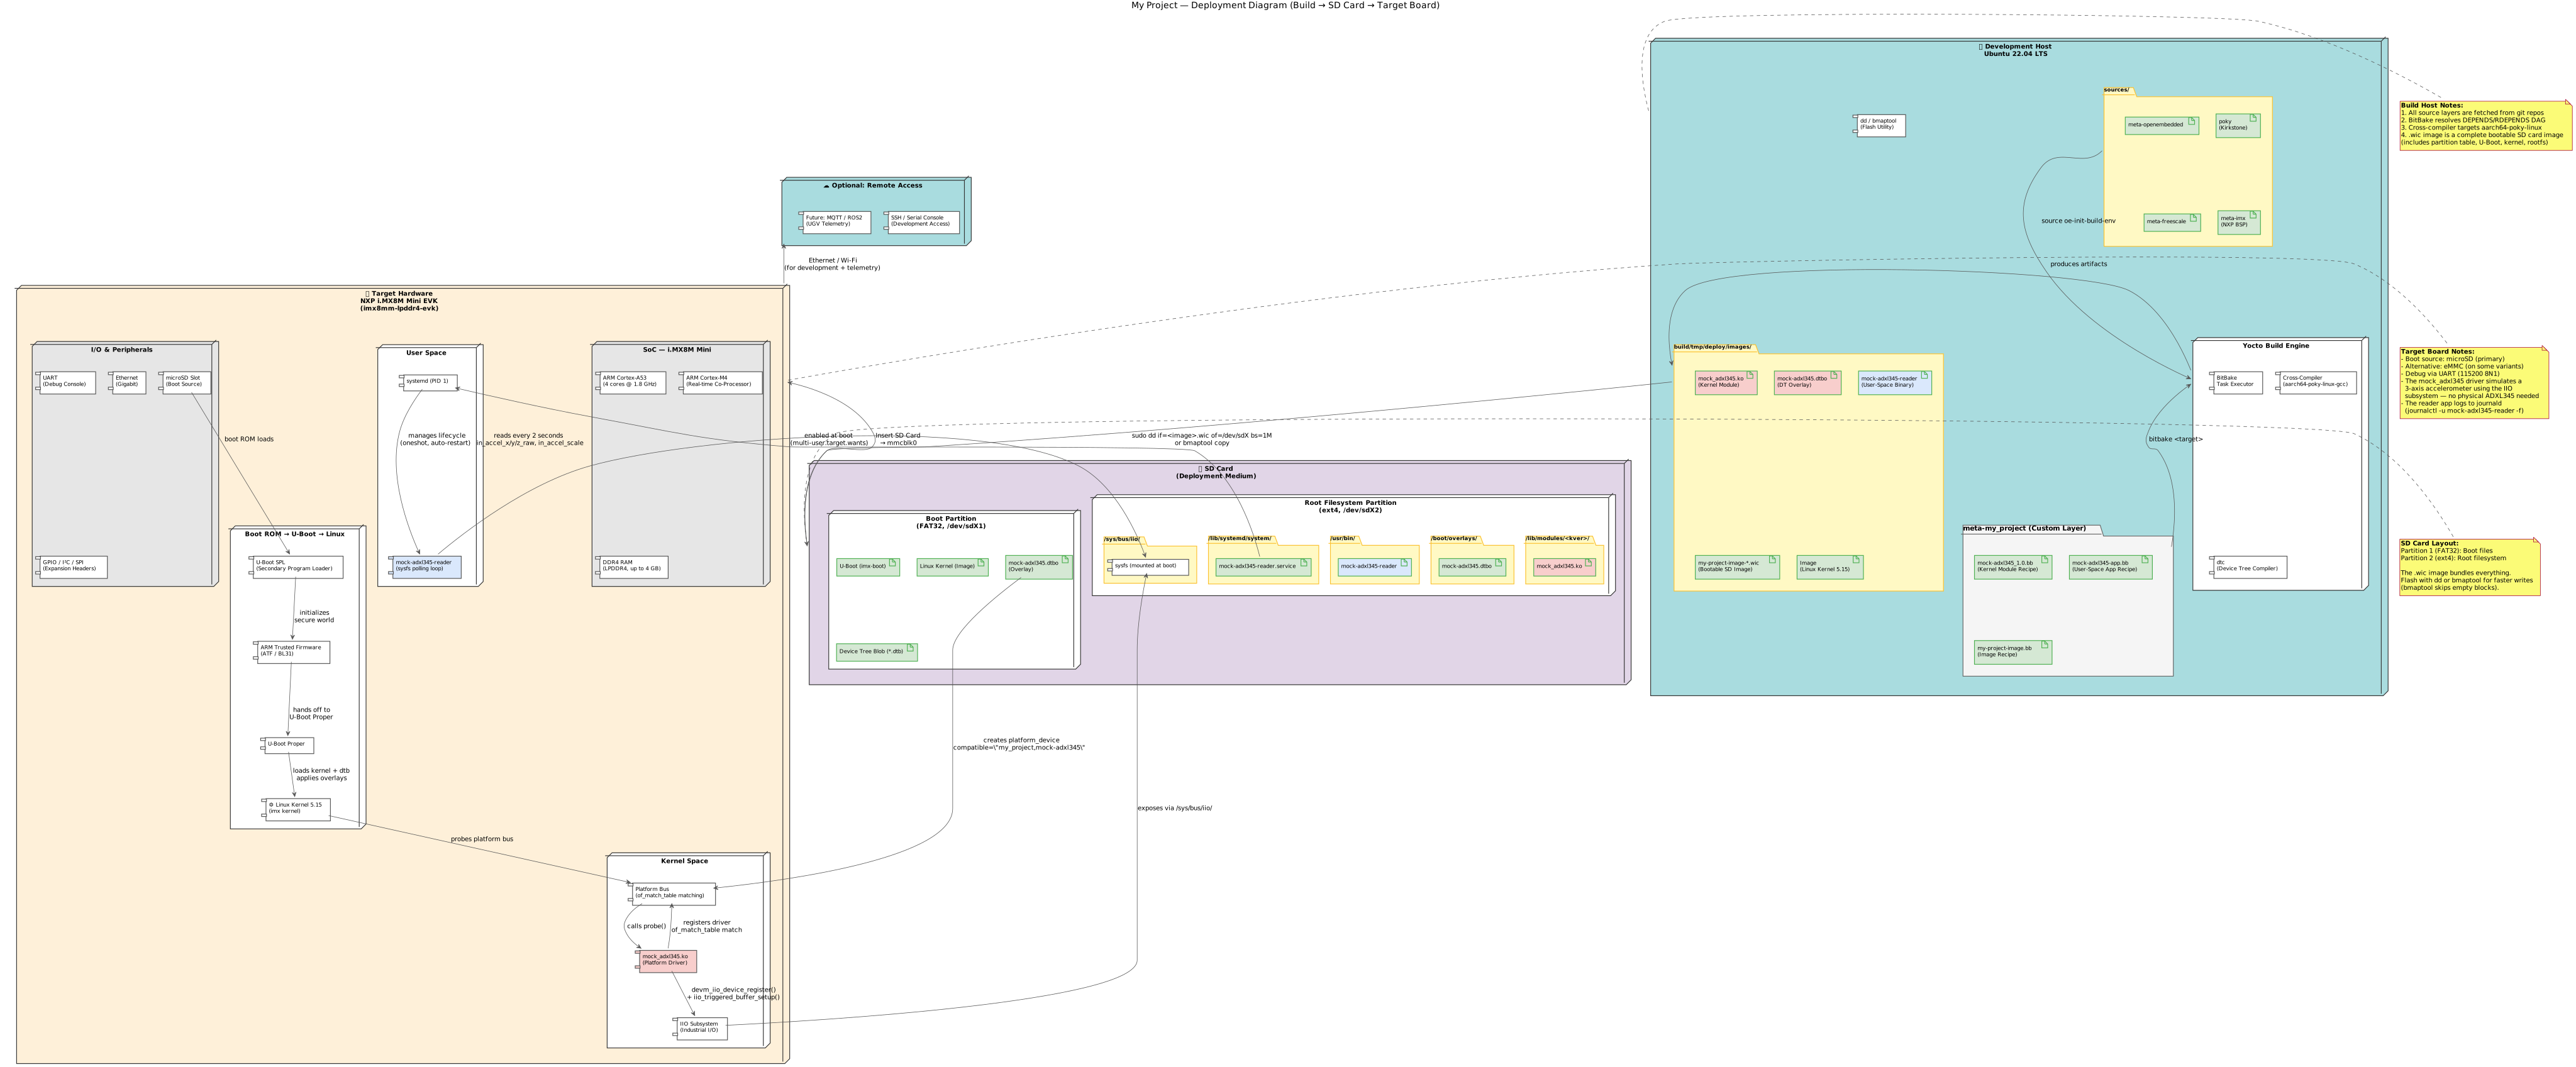 SD card layout and boot flow on target hardware SD card layout and boot flow on target hardware | Step 20 (Completion) |
Tutorial Application Architecture
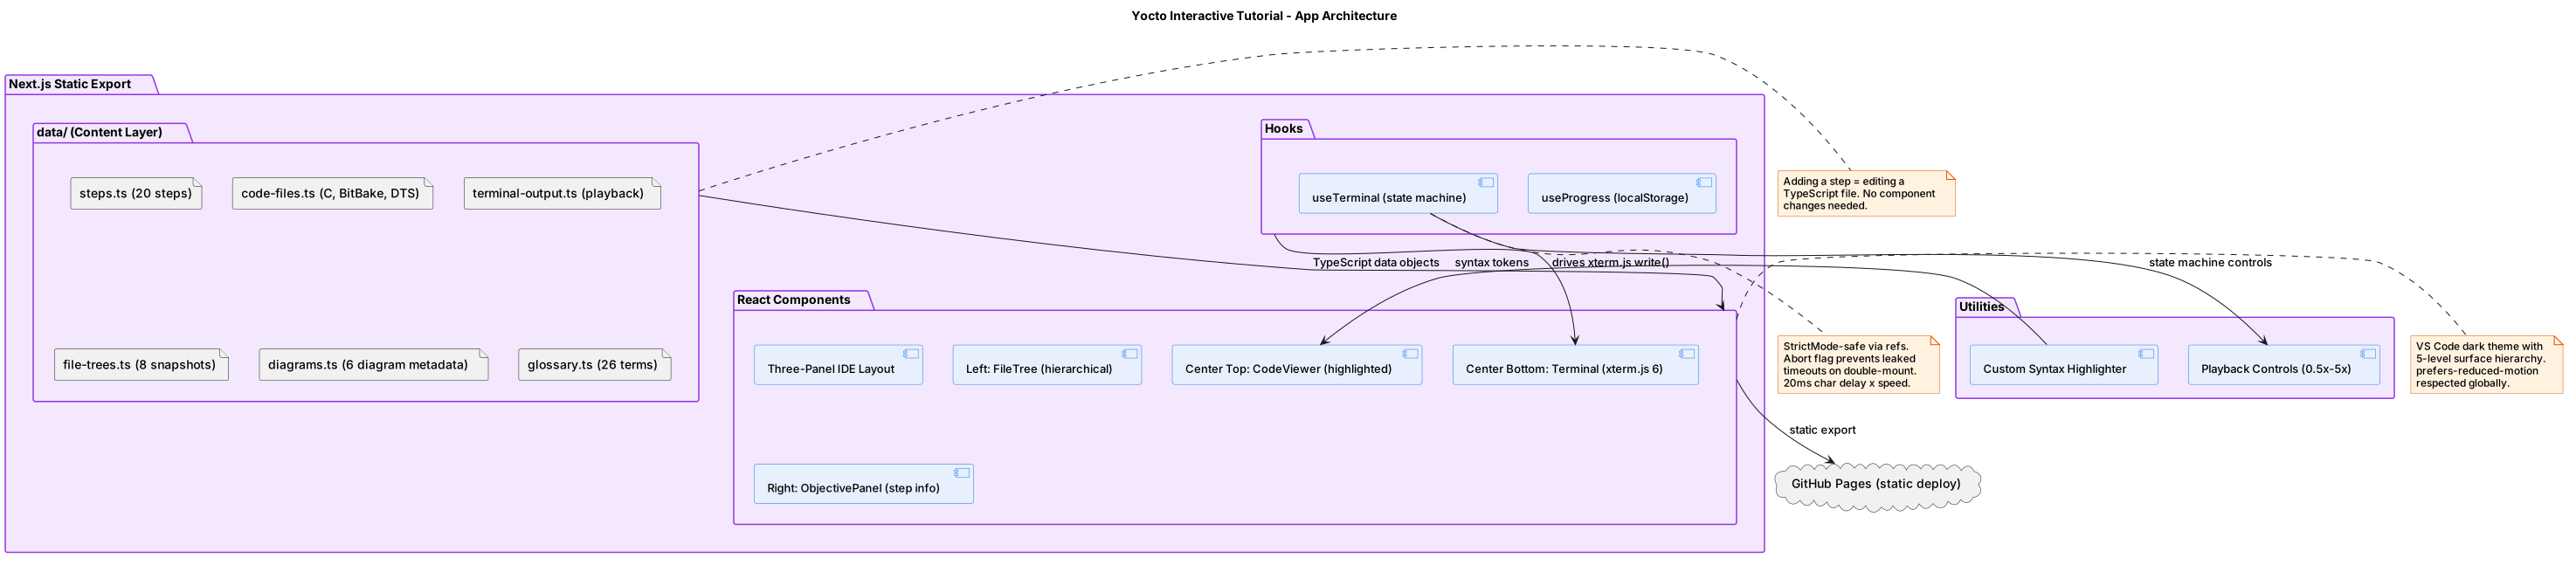 The tutorial app’s own software architecture: data-driven content layer (
data/*.ts TypeScript objects) feeding generic React components, the three-panel IDE layout (file tree + code viewer + terminal + objectives panel), the useTerminal state machine driving xterm.js playback, and static export to GitHub Pages.
What I Learned
Building an IDE-like experience entirely in the browser without a backend taught me a lot about React’s concurrency model. The trickiest part was the terminal playback in React StrictMode: because StrictMode double-mounts and double-invokes effects, terminal write functions could get orphaned or captured in stale closures. The solution was to store the write function in a ref and only use it through the ref, bypassing the closure chain entirely.
I also learned that terminal playback timing is more art than science. Real terminals don’t produce output at a constant rate — they burst, then pause, then burst again. The TerminalLine type includes an optional delay property per line, which lets each step define its own rhythm. Some steps have rapid-fire apt-get install output that feels right at 50 ms per line; others need a 500 ms pause before a command prompt to feel natural.
The data-driven architecture paid off immediately during development. I could write and test new steps by editing a single TypeScript file, reload, and see the changes without touching a React component. This separation of content from presentation is something I would carry into any future tutorial-style project.